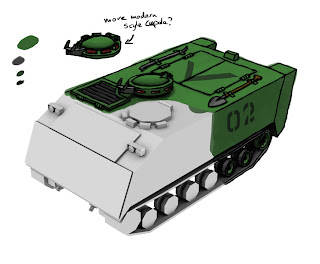
Since part of the original idea of this APC design was that the chassis would also be used as the basis of a bunch of other vehicles, it's about time some of these other roles were considered.
First up; Self-Propelled Anti-Aircraft Guns
Since there's so much room in the hull, I decided to try an unmanned turret design - it has the added advantage of being a lot safer for the operators.
This one was based on WW2 heavy anti-aircraft guns like the Flak '88, along with more modern automated turrets (such as the Stryker MGS). I like the idea, but I think the gun design needs some work.
This one was done because the gunshield on the heavy SPAAG gives it a very WW2 German flavour, and I wondered what the first one would look like with the same sort of shield. Combined with the gunshield from the previous post, there's a definite WW2 German aesthetic developing here.
Saturday, 11 August 2012
Thursday, 9 August 2012
APC Design 5
First some options to make operating the machine gun safer
And then some options for making being in the vehicle safer
And then some options for making being in the vehicle safer
Tuesday, 7 August 2012
APC Design 4
Trying out different styles of machine gun
Seeing them in this order sort of makes me think of an upgrade tree for a video game...
 |
| Light Machine Gun |
 |
| GPMG |
 |
| Heavy MG |
 |
| Water-Cooled Heavy MG |
Seeing them in this order sort of makes me think of an upgrade tree for a video game...
Monday, 6 August 2012
APC Design 3
Updated the rough model with details worked out in the development pictures
Rotated the model to look at the only side not yet developed
Next step - developing options/variants
Rotated the model to look at the only side not yet developed
Saturday, 4 August 2012
APC design 2
Continuing the new technique; working on the rear of the APC.
Step 5. Rotate the basic model from the previous step
Step 6. Experiment with different rear door designs
Step 7: Experiment with different rear light arrangements
A big benefit of this technique is the ease of comparing different designs/details
Step 5. Rotate the basic model from the previous step
Step 6. Experiment with different rear door designs
 |
| Hydraulic Ramp |
 |
| Combined Door/Ramp |
 |
| Double Doors |
Step 7: Experiment with different rear light arrangements
A big benefit of this technique is the ease of comparing different designs/details
Friday, 3 August 2012
New Vehicle Design Technique
Okay, I've come across a new vehicle design technique based around merging basic 3-D models and photoshop, so I'm giving it a go.
For the purpose of the trial, I'm trying to produce a bunch of different vehicles based on the same basic chassis (an APC) so the first job is to design the base chassis.
Step 1: a very basic geometry block out, mainly just to get the perspective right.
Step 2: draw/paint over the model in photoshop to add details
Step 3: use the drawing to refine the basic model, adding detail etc.
Step 4: pick an area and draw/paint more detail/options
Subscribe to:
Comments (Atom)


