Sunday, 23 December 2018

Christmas decorations the digital artist way

This Christmas, I decided to sculpt and print something for the tree.

ZBrush render

Studio Photographs


"Arty" Photographs

Friday, 23 November 2018

Planes n' Things 2018

Since the end of the year is approaching, here's a selection of stuff from this year's tumblr feeds


Thursday, 22 November 2018

1:350 Scale Boat base

I got asked by a friend who's into making scale models of warships and the like if I could make a base model from some photographs (since the ship in question definitely doesn't have a model kit available)


All I had to go on for dimensions was that the wheel house was 2m tall.

Block out

(When your source images have wildly different focal lengths, your image plane placement can get a little eccentric)


After creasing, subdividing and generally detailing, it was off to the SLA printer


Tuesday, 18 September 2018

1:3 scale Smart Rifle


Another experiment to try and learn Fusion360 - I just started 3Doodling around and ended up with a sci-fi rifle


My initial plan was to print it out full size as a prop, so I started by printing the hand grip, to make sure that
a)  I was at the correct scale, and
b)  It wasn't cripplingly uncomfortable to hold


First print - slightly too small
Second print - slightly too large
Third print - the size was right, but the end result was NOT comfortable to hold - the gap between the trigger finger & the other fingers was too big, the separate finger groves were uncomfortable, and the thumb hole was awkward.

left to right - too small, too big, right scale but uncomfortable

At this point, I went back to Fusion360 and redesigned the grip section.  I also decided to try printing out a 1:3 scale version, before I decided if I wanted to commit to printing a full-sized prop.

one DIY model kit - instructions not included

After plenty of sanding, to fix my mistakes (don't leave uncured prints in IPA too long - they swell up and wont fit together without some... persuasion), I was able to glue the prints together


After filling the gaps, and sanding the filler, (repeat as necessary, it was time to prime and paint)


Colour choice was mainly dictated by the red and grey spray cans I had lying around - a decision that in retrospect may have been a mistake (the paint added a pretty hefty texture, and didn't adhere well to the silver undercoat).  As a result, I heavily weathered the finished piece to try and hide the crimes


Final details were added by hand, using a paintbrush

Monday, 13 August 2018

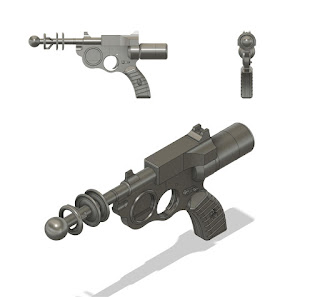
Experimenting with parametric modelling - 3D printing a steampunk raygun

So, I recently discovered that Autodesk offer a free license for Fusion 360 for hobbyists/startups.  Since I'd also been watching a lot of prop-making videos on youtube, the way forward was clear - model & print an old design for a steampunk raygun

Old Sketch
Fusion 360 model
The model was sized using a couple of measurements from a nerf gun, but mostly it was just eyeballed.  So, the first step was to print out the handgrip/trigger section to make sure it fit in my hand (it did)

To fit it on the printer, the model was broken up into several large parts, and numerous smaller details.
Once the main parts were printed out, I stuck them together with blutac to get an idea of the general outline (several parts hadn't been fully modelled at this point, including the handgrips)

Every part printed out, sanded, filled, and then sanded some more
Most of the model was printed in PLA on an FDM printer, but a couple of parts (due to complicated shape, or small details) were printed on an SLA printer.  To get rid of the layer lines, the FDM parts were repeatedly sprayed with filler primer and then sanded, until a smooth finish was achieved.

Once the model was assembled, it was painted using an airbrush and a mixture of acrylic & lacquer paints, including a couple of buffable metalizer paints.

The final stage was weathering, which included printing a couple of paper details - they were stuck on with spray mount.
As printed, the power cell at the back was removable using a twist-lock mechanism, but the tolerances were too tight for paint, even after a lot of sanding, so the power cell now remains attached.

Final beauty shots